Ever wondered how to draw a bow like a pro? Whether you're an aspiring artist or just looking to add this skill to your creative toolkit, drawing a bow can be both fun and rewarding. From ancient myths to modern pop culture, bows have captured our imagination for centuries. So, why not bring that magic to life on paper?
Learning how to draw a bow isn’t as hard as it seems. With the right techniques and a bit of practice, you’ll be sketching bows that look realistic and stylish in no time. In this guide, we’ll walk you through everything you need to know, from basic shapes to intricate details, so you can create stunning artwork.
So grab your pencils, erasers, and a clean sheet of paper. Let’s dive into the world of bow drawing and turn your creative visions into reality. You won’t regret it!
Read also:Minecraft Cupcakes The Ultimate Sweet Adventure For Your Inner Builder
Table of Contents
- Understanding the Basics of Bow Drawing
- Gathering Your Materials
- Step-by-Step Guide on How to Draw a Bow
- Exploring Different Bow Styles
- Pro Tips for Better Bow Drawings
- Common Mistakes to Avoid
- Digital Tools for Drawing Bows
- The History of Bows in Art
- Practice Makes Perfect
- Conclusion: Start Drawing Your Own Bows Today!
Understanding the Basics of Bow Drawing
Before we jump into the nitty-gritty, let’s break down what makes a good bow drawing. A bow, in its simplest form, is a curved piece of wood or metal with a string attached at both ends. But when it comes to art, there’s so much more to consider. Think about the curves, the tension in the string, and even the details of the grip.
Understanding these elements is crucial if you want to create a realistic and visually appealing bow. And don’t forget, practice makes perfect. The more you draw, the better you’ll get at capturing the essence of this iconic weapon.
What Makes a Bow Unique?
- Curved Shape: The signature curve of a bow gives it its characteristic look.
- String Tension: The string is what makes the bow functional, so getting its tension right is key.
- Grip and Design: Different bows have different grips and designs, so studying these variations can help add depth to your artwork.
Gathering Your Materials
Alright, let’s talk supplies. To start drawing a bow, you’ll need a few essential tools. First off, grab a good set of pencils—HB for outlining and 2B or 4B for shading. You’ll also want a nice eraser to fix any mistakes along the way. And don’t forget a ruler if you’re aiming for precision in your lines.
For beginners, sketching on regular printer paper works just fine. But if you’re serious about improving your skills, consider investing in some high-quality drawing paper. It’ll make a noticeable difference in the final result.
Optional Tools
- Colored Pencils: If you want to add color to your bow, colored pencils are a great option.
- Blending Stumps: These help smooth out your shading for a more professional look.
- Digital Tablets: For those interested in digital art, tablets like the iPad Pro or Wacom are fantastic tools.
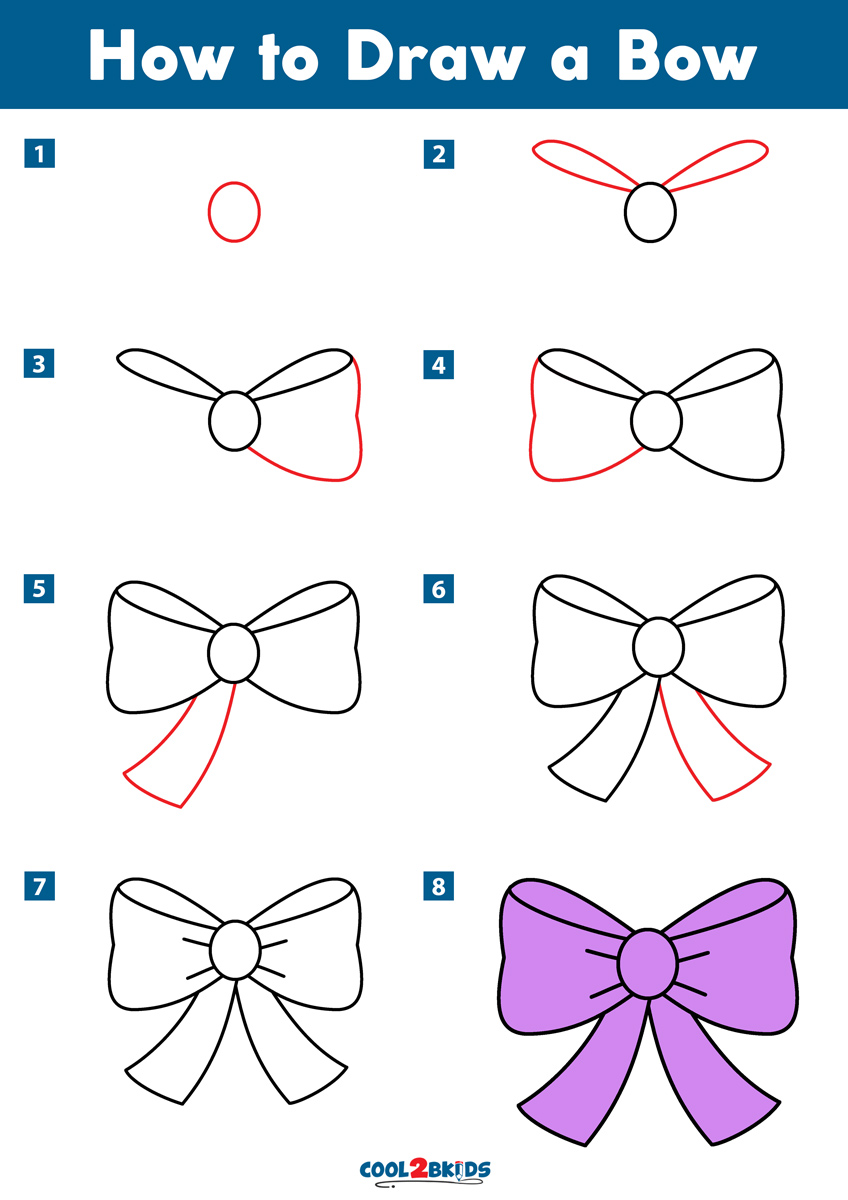
Step-by-Step Guide on How to Draw a Bow
Now that you’ve got your materials ready, let’s dive into the step-by-step process of drawing a bow. We’ll start with the basics and gradually add more details as we go along. By the end of this section, you’ll have a complete bow drawing that you can be proud of.
Step 1: Sketch the Basic Shape
Begin by lightly sketching the general shape of the bow. Think of it as an elongated "D" with a slight curve. This will serve as the foundation for your drawing. Remember, keep your lines light at this stage because you’ll be erasing and refining them later.
Read also:Karla Denize The Rising Star Whorsquos Making Waves In The Entertainment World
Step 2: Add the String
Next, draw the string connecting the two ends of the bow. Make sure it’s taut but not too straight—it should have a slight curve to show tension. This is where the magic of a bow really comes alive.
Step 3: Detail the Grip
The grip is an important part of any bow. Depending on the style, it could be simple or intricate. For now, just add a rectangular shape in the middle of the bow to represent the grip. You can refine it later.
Step 4: Refine and Shade
Once you’ve got the basic structure down, it’s time to refine your lines and add shading. Pay attention to the curves and angles of the bow, and don’t be afraid to experiment with different shading techniques to give your drawing depth and dimension.
Exploring Different Bow Styles
Bows come in all shapes and sizes, from traditional longbows to modern compound bows. Each style has its own unique characteristics that you can incorporate into your drawings. Let’s take a look at some of the most popular bow styles and how you can draw them.
Traditional Longbow
A longbow is a classic choice for artists. Its simple yet elegant design makes it a great starting point for beginners. Focus on the smooth curves and minimalistic details to capture its timeless appeal.
Recurve Bow
Recurve bows are slightly more complex, with their distinctive curved ends. This added complexity can make your drawing stand out, especially if you pay attention to the curves and angles.
Compound Bow
For those looking for a challenge, try drawing a compound bow. These modern bows have intricate designs and mechanical parts that can add a lot of detail to your artwork. Just be prepared to spend some extra time getting everything just right.
Pro Tips for Better Bow Drawings
Here are a few tips to help you take your bow drawings to the next level:
- Study Real Bows: Look at pictures or videos of real bows to understand their structure and design.
- Practice Shading Techniques: Experiment with different shading methods to add depth and dimension to your drawings.
- Use Reference Images: Don’t be afraid to use reference images to help guide your sketches.
Common Mistakes to Avoid
Even the best artists make mistakes, but being aware of them can help you avoid common pitfalls. Here are a few things to watch out for:
- Overcomplicating the Design: Keep it simple, especially when you’re starting out.
- Ignoring Proportions: Make sure the different parts of the bow are in proportion to each other.
- Forgetting the String: The string is a crucial part of the bow, so don’t forget to include it in your drawing.
Digital Tools for Drawing Bows
If you’re interested in digital art, there are plenty of tools available to help you create stunning bow drawings. Programs like Adobe Illustrator and Procreate offer a wide range of features that can make your artwork pop. Plus, they allow you to easily edit and refine your drawings without having to start over from scratch.
For beginners, apps like Sketchbook or Autodesk Fresco are great options. They’re user-friendly and packed with features that can help you create professional-quality artwork.
The History of Bows in Art
Bows have been a popular subject in art for centuries. From ancient cave paintings to modern digital art, they’ve captured the imagination of artists around the world. Studying the history of bows in art can give you valuable insights into how they’ve been depicted over time and inspire your own creations.
For example, medieval artists often depicted bows as symbols of power and strength, while Renaissance painters used them to convey elegance and grace. Understanding these historical contexts can help you add meaning and depth to your own bow drawings.
Practice Makes Perfect
Like any skill, drawing a bow takes practice. The more you draw, the better you’ll get. Set aside some time each day to work on your skills, and don’t be discouraged if your early attempts don’t turn out exactly as you hoped. Every great artist started somewhere, and with persistence, you’ll get there too.
And remember, it’s all about having fun. So grab your pencils and start drawing those bows!
Conclusion: Start Drawing Your Own Bows Today!
So there you have it—your ultimate guide to drawing a bow. From understanding the basics to exploring different styles and techniques, we’ve covered everything you need to know to create stunning bow drawings. Remember, practice is key, so don’t be afraid to experiment and try new things.
Now it’s your turn. Grab your materials and start drawing. And when you’re done, share your masterpiece with the world. Who knows? You might just inspire someone else to pick up a pencil and start drawing their own bows.